12 min read
Introduction
In October 2023, Microsoft officially ended support for the old Retail SDK. As an alternative, developers are encouraged to transition to the new version of the SDK, known as Commerce SDK. This upgrade helps minimize errors during environment updates and reduces the time required for the update process.
The key difference between Retail SDK and Commerce SDK is that in Commerce SDK, each extension package can be developed and deployed independently of others. This allows developers to prepare and develop extensions for the Channel Database, Commerce Scale Unit, POS, and Hardware Station within a single solution, without the need to transfer them between different solutions, as was required with Retail SDK.
In this article, we will explore the process of creating and installing necessary extensions in the D365 Commerce development environment. All examples will be based on the demo data of the Contoso company and the Sample Projects from GitHub, making it easy for anyone to reproduce them.
Let’s get started!
Required Projects and preparation
After setting up our development environment (Dev) and exporting all data from HQ to the Retail Channel Database using CDX Jobs, we need to download the Sample Projects from the following repositories:
• Dynamics365Commerce.ScaleUnit
Let’s assume we want to place both projects in a folder located at J:\CommerceProjects.
NOTE: Avoid using spaces in folder names, as the installer compiler may not handle them correctly.
To do this, run the following PowerShell script:
cd J:\CommerceProjects\
git clone https://github.com/microsoft/Dynamics365Commerce.InStore.git
git clone https://github.com/microsoft/Dynamics365Commerce.ScaleUnit.git
Now, let’s review the structure of each project and the changes we need to make if we want to create our own extension.
Both solutions contain similar projects required to implement the logic for your extension:
- Channel Database.
- This project contains scripts to extend the data model for the Channel Database. When creating a new script, it must be added to this project.
- IMPORTANT: The project must have a dependency on the following NuGet package:
- Microsoft.Dynamics.Commerce.Sdk.ChannelDatabaseThis is necessary for the proper build and installation of the scripts through ScaleUnitInstaller.
- CommerceRuntime.
- This project includes all the core logic of the extension for the Retail Server. To ensure that the DLL installs correctly on the Retail Server, make sure of the following:
- IMPORTANT: The project has a dependency on the NuGet package: Microsoft.Dynamics.Commerce.Sdk.Runtime
- IMPORTANT: A trigger is added to GetExtensionPackageDefinitionsRequest to register the name of your extension (see example below).
- POS.
- This project contains the client logic for the Store Commerce App or CPOS. The following dependencies must be resolved for the package to build successfully:
- IMPORTANT: A reference to the knockout.js project from NuGet.
- IMPORTANT: The NuGet package: Microsoft.Dynamics.Commerce.Sdk.Pos, which is required to generate the installer and compile the project.
- IMPORTANT: Add a reference to the CommerceRuntime project from step 2 so that the compiler can generate the necessary Typescript proxy files for the POS code.Be sure to also follow the additional Commerce SDK requirements described here.
- HardwareStation.
- In this project, we add the components necessary for handling signals from the Hardware Station.
- IMPORTANT: Make sure to add a reference to the following NuGet package:
- Microsoft.Dynamics.Commerce.Sdk.HardwareAndPeripherals.
Now let’s look at the additional projects you need to include in your solution to generate an installer for applying changes in your environment:
- ScaleUnit.
- You need to add a Class Library project with support for .NET Framework 4.72 (more details here). After creating the project, add references to all the projects (Channel Database, POS, and CommerceRuntime) present in the solution.
- IMPORTANT: Don’t forget to add a reference to the following NuGet package:
- Microsoft.Dynamics.Commerce.Sdk.Installers.ScaleUnit.After building the project, the installer and all necessary libraries will be placed in the bin\Debug\net472 directory, from where they can be installed using several methods (instructions below).
- InStore.
- The steps here are similar to the ScaleUnit project, except that the set of referenced projects and NuGet packages may vary.
- IMPORTANT: Instead of ScaleUnit, add dependencies on:• Microsoft.Dynamics.Commerce.Sdk.Installers.StoreCommerce.
Now let’s look at the sequence of adding components to the projects, as well as how to install the extensions.
Component Development Process in D365 Commerce
1. Channel Database: Adding Extension Scripts
The main purpose of the Channel Database project is to extend the existing data model for the Retail Channel. To add new tables, indexes, or stored procedures to the Channel Database, follow these steps:
• In the Channel Database project, create a new SQL file that contains the DDL commands for adding new tables or views, as well as any changes to the database.
• Example of a SQL script structure:
IF (SELECT OBJECT_ID('[ext].[CONTOSO_STORECOMMERCE_EXAMPLETABLE]')) IS NULL
BEGIN
    CREATE TABLE
        [ext].[CONTOSO_STORECOMMERCE_EXAMPLETABLE]
    (
        [EXAMPLEID]     BIGINT IDENTITY(1,1) NOT NULL,
        [EXAMPLEINT]    INT NOT NULL DEFAULT ((0)),
        [EXAMPLESTRING] NVARCHAR(64) NOT NULL DEFAULT (('')),
        CONSTRAINT [I_EXAMPLETABLE_EXAMPLEID] PRIMARY KEY CLUSTERED
        (
            [EXAMPLEID] ASC
        ) WITH (PAD_INDEX = OFF, STATISTICS_NORECOMPUTE = OFF, IGNORE_DUP_KEY = OFF, ALLOW_ROW_LOCKS = ON, ALLOW PAGE LOCKS = ON) ON [PRIMARY]
    ) ON [PRIMARY]

    ALTER TABLE [ext].[CONTOSO_STORECOMMERCE_EXAMPLETABLE] WITH CHECK ADD CHECK (([EXAMPLEID]<>(0)))
END
GO

GRANT SELECT, INSERT, UPDATE, DELETE ON OBJECT::[ext].[CONTOSO_STORECOMMERCE_EXAMPLETABLE] TO [DataSyncUsersRole]
GO
• IMPORTANT: When adding new extension scripts to the Channel Database project, use proper file naming conventions to ensure the correct execution order when sorted alphabetically. More details on the naming conventions can be found here.
2. CommerceRuntime: Adding Business Logic
The CommerceRuntime project is responsible for core business logic and request processing in Commerce Scale Unit (Retail Server). For instance, to handle data retrieval requests or business processes, you can create a new handler or trigger to process the request with pre- or post-processing.
• IMPORTANT: Don’t forget to register your handler in the GetExtensionPackageDefinitionsRequest event so that Commerce Scale Unit recognizes your extension. Example code for registering an extension:
namespace Contoso.CommerceRuntime
{
    using System;
    using System.Collections.Generic;
    using System.Threading.Tasks;
    using Microsoft.Dynamics.Commerce.Runtime;
    using Microsoft.Dynamics.Commerce.Runtime.DataModel;
    using Microsoft.Dynamics.Commerce.Runtime.Messages;

    public class DefinePosExtensionPackageTrigger : IRequestTriggerAsync
    {
        public IEnumerable<Type> SupportedRequestTypes => new[] { typeof(GetExtensionPackageDefinitionsRequest) };

        public Task OnExecuted(Request request, Response response)
        {
            var getExtensionsResponse = (GetExtensionPackageDefinitionsResponse)response;
            var extensionPackageDefinition = new ExtensionPackageDefinition();

            // The name must match the PackageName used when packaging the customization package (for example, in CustomizationPackage.props).
            extensionPackageDefinition.Name = "Contoso.StoreCommercePackagingSample";
            extensionPackageDefinition.Publisher = "Contoso";
            extensionPackageDefinition.IsEnabled = true;

            getExtensionsResponse.ExtensionPackageDefinitions.Add(extensionPackageDefinition);

            return Task.CompletedTask;
        }

        public Task OnExecuting(Request request)
        {
            return Task.CompletedTask;
        }
    }
}
IMPORTANT: The package name must exactly match the PackageName used when creating the customization package. This name is set in the CustomizationPackage.props file located at the root of your solution:CopyCopy
<Project>
  <Import Project="..\..\..\repo.props" />

  <PropertyGroup>
    <PackageName Condition="'$(PackageName)' == ''">Contoso.StoreCommercePackagingSample</PackageName>
    <PackageDisplayName Condition="'$(PackageDisplayName)' == ''">Contoso Store Commerce Customization Packaging Sample</PackageDisplayName>
  </PropertyGroup>
</Project>
3. POS: Adding User Interface Components
To integrate your extension into POS, you can follow the instructions below:
More detailed information on the API can be found here.
Also, don’t forget to define the POS app structure in a manifest file, like this:CopyCopy
{
  "$schema": "./devDependencies/schemas/manifestSchema.json",
  "name": "Contoso.StoreCommercePackagingSample",
  "publisher": "Contoso",
  "version": "1.0.0",
  "minimumPosVersion": "9.28.0.0",
  "description": "An extension package containing POS samples.",
  "dependencies": [
    {
      "alias": "knockout",
      "format": "amd",
      "modulePath": "Libraries/knockout"
    }
  ],
  "components": {
    "resources": {
      "supportedUICultures": [ "en-US" ],
      "fallbackUICulture": "en-US"
    },
    "create": {
      "views": [
        {
          "title": "Knockout Samples View",
          "pageName": "KnockoutSamplesView",
          "viewDirectory": "Views/",
          "viewControllerPath": "Views/KnockoutSamplesView"
        }
      ]
    }
  }
}
4. HardwareStation: Adding Support for New Hardware
If your extension requires integration with new hardware (e.g., printers or scanners), you’ll need to add the necessary signal processing logic to the HardwareStation project. Follow these steps:
• Create a new class for handling the hardware. Example code:
namespace Contoso.Commerce.HardwareStation.ISVExtensionDevice
{
    using Microsoft.Dynamics.Commerce.Runtime.Hosting.Contracts;
    using System;
    using System.Threading.Tasks;

    [RoutePrefix("ISVEXTENSIONDEVICE")]
    public class ISVExtensionDeviceController : IController
    {
        [HttpPost]
        public async Task<CustomResponse> Sample(CustomRequest request, IEndpointContext context)
        {
            return await Task.FromResult(new CustomResponse());
        }
    }

    public class CustomResponse
    {
        public string sampleProp { get; set; } = "sampleValue";
    }
}
• IMPORTANT: To ensure proper communication with the Hardware Station, add a reference to the Microsoft.Dynamics.Commerce.Sdk.HardwareAndPeripherals NuGet package.
• You can find more details on the process in the documentation here.
5. Adding Components to ScaleUnit and InStore
After adding all the necessary components to the Channel Database, POS, CommerceRuntime, and HardwareStation projects, it’s time to integrate them into the system using the ScaleUnit and InStore projects.
ScaleUnit
The ScaleUnit project plays a key role in managing the deployment of extensions, as it controls the deployment of all components to the Commerce Scale Unit. To set up ScaleUnit, follow these steps:
1. Create a new Class Library project that targets .NET Framework 4.72. More details on creating such projects can be found here.
2. In this project, add references to the following projects:
• Channel Database
• POS
• CommerceRuntime
3. Add a dependency on the Microsoft.Dynamics.Commerce.Sdk.Installers.ScaleUnit NuGet package.
4. After building the project, the installer and all required libraries will be located in the bin\Debug\net472 directory. This installer can be used to deploy changes to the environment.
5. IMPORTANT: When building the project, the installer in Visual Studio may attempt to automatically install it. If it doesn’t, the next section will explain how to manually install it.
InStore
The InStore project is similar to ScaleUnit, but it manages the installation of extensions for the Store Commerce App. The setup steps are as follows:
1. Create a new Class Library project targeting .NET Framework 4.72.
2. Add references to projects such as:
• POS
• HardwareStation (if needed).
3. Add a dependency on the Microsoft.Dynamics.Commerce.Sdk.Installers.StoreCommerce NuGet package.
4. Like with ScaleUnit, the installer file will be available after building the project in the bin\Debug\net472 directory.
5. If the installation doesn’t occur automatically, the next section will explain how to install it manually.
Installing Extensions in Commerce Scale Unit
1. Prepare the installer:
After building the ScaleUnit project, navigate to the bin\Debug\net472 directory where the installer and necessary libraries are located. This installer will be used to deploy changes to the Commerce Scale Unit environment.
2. Open PowerShell as Administrator:
Open PowerShell as an administrator in the directory where the installer is located. Make sure PowerShell is launched from this folder so that all commands are executed in the correct context.
3. Run the installer:
Run the following PowerShell command to install the extension. The command should run your installer, for example:
.\ScaleUnitInstaller.exe install
4. Apply and verify installation:
During installation, the installer will apply all ChannelDatabase scripts to the database. If any errors occur, it’s best to correct the files in the project and rebuild the installer for another attempt at installation in the environment.
After the process is complete, a new DLL from your CommerceRuntime project should appear in the RetailServer extensions folder (by default located at J:\RetailServer\WebRoot\bin\Ext), and the CommerceRuntime.Ext file should be updated. If this doesn’t happen or the DLL version remains unchanged, you can manually transfer the updates by following this guide.
Installing Extensions in Store Commerce App (InStore)
1. Check for Store Commerce App:
Before installing extensions, ensure that Store Commerce App is installed on your machine, as it is not installed by default. You can find instructions on installing Store Commerce App here.
2. Prepare the installer:
After building the InStore project, navigate to the bin\Debug\net472 directory where the installer and necessary libraries are located. This installer will be used to deploy changes to the Store Commerce App environment.
3. Open PowerShell as Administrator:
Open PowerShell as an administrator in the directory where the installer is located. Make sure PowerShell is launched from this folder so that all commands are executed in the correct context.
4. Run the installer:
Run the following PowerShell command to install the extension. The command should run your installer, for example:
.\StoreCommerceInstaller.exe install
5. Apply and verify installation:
After the installation process is complete, restart the Store Commerce App for the changes to take effect.
6. Verify extension installation:
To verify that the extension is installed correctly:
• Navigate to the following path on your machine: C:\Program Files\Microsoft Dynamics 365\10.0\Store Commerce\Extensions. If the installation was successful, this directory will contain a folder named after your package, matching the name from the CustomizationPackage.props file we discussed earlier.
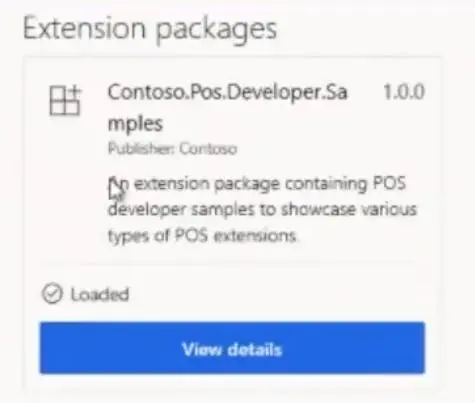
• Additionally, if everything was done correctly, your extension’s name will be displayed in the application settings when launching Store Commerce App. An example is shown in the following image.

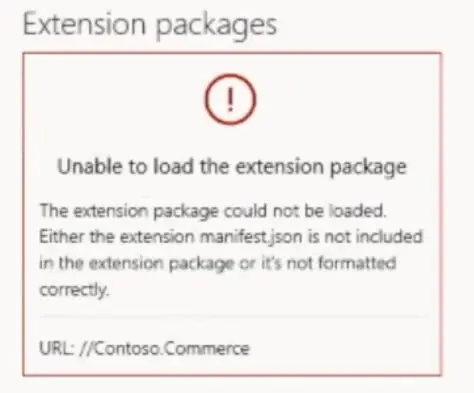
If the extension does not appear in the application settings, it could mean one of the following:
• Either the handler for the GetExtensionPackageDefinitionsRequest method on the RetailServer is returning the incorrect extension package name.
• Or the package itself was installed incorrectly.
An example of an error where the extension does not appear is shown in the following image.

Note on Uninstalling Extensions
To uninstall an extension, you can use the uninstall command on the same installer file located in the bin\Debug\net472 directory. Run the following command:
.\ScaleUnitInstaller.exe uninstall
or
.\StoreCommerceInstaller.exe uninstall
Summary
In this article, we discussed the migration process from Retail SDK to Commerce SDK in D365 Commerce, focusing on the development and installation of extensions for various system components. The key points of the article include:
1. Creating and installing extensions for Channel Database: We detailed how to add new tables and views using SQL scripts and explained the importance of proper file naming conventions to ensure scripts are executed correctly during database updates.
2. Adding business logic to CommerceRuntime: In this section, we covered how to register extensions and handle requests using triggers and event handlers. We also provided code examples for registering extensions in the GetExtensionPackageDefinitionsRequest method.
3. Adding components to POS: We discussed how to integrate extensions into the POS user interface. This included instructions for creating forms, adding operations and triggers, and providing an example of a manifest file for POS applications.
4. Adding support for new hardware via HardwareStation: We provided a code example for handling interactions with new hardware (e.g., printers) through HardwareStation and explained how to properly integrate devices.
5. Installing extensions in Commerce Scale Unit and Store Commerce App: We outlined step-by-step instructions for installing extensions in the Commerce Scale Unit and Store Commerce App environments, starting from preparing the installers and ending with verifying successful installation. We also covered how to uninstall extensions using the uninstall command.
Key Takeaways
• Migrating to Commerce SDK offers more flexibility and improves the development and deployment process for extensions in D365 Commerce.
• Each component (Channel Database, POS, CommerceRuntime, and HardwareStation) requires its own setup and proper registration.
• Installing extensions across various Commerce environments requires careful attention, especially when managing installers and configuration files.
• Verifying successful installation involves checking both file-level integration and application-level interface functionality to ensure that extensions are correctly integrated.


